The 4c Seaway Lock Stamp of the 1967-1973 Centennial Issue Part Three
This week's post will examine the booklet stamps, miniature pane stamps and coil stamps of the 4c seaway lock stamp from this issue. Unitrade and McCann differ slightly in terms of the fluorescent paper varieties that they list for the booklet stamps, but otherwise, they are fairly close in terms of their listings. McCann does list two plate flaws on the BABN booklets, that are not listed in Unitrade, and these are described in this post.
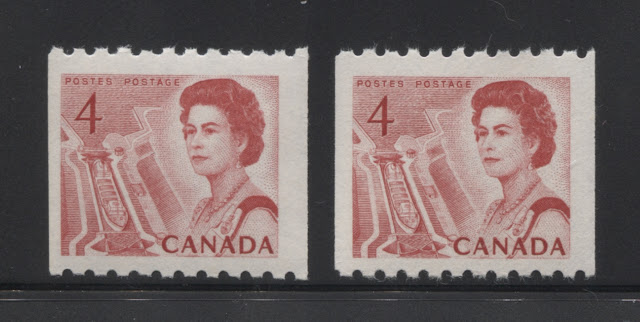
The coils are listed by Unitrade as having all the usual varieties associated with CBN printed coils, such as jump strips, cutting guideline strips and repair paste-ups. However, in addition, there are narrow and wide spacing strips that exist. Unitrade notes the existence of these, but does not list them. Unitrade also lists two basic paper types: DF and LF-fl. However, as we shall see, there are several different types of paper, shade and gum on the coil stamps. So that it is possible to build a considerable amount of scope into a collection of them.
The CBN Booklet Stamps Perf. 12 - Unitrade #457as, ais, aiis, and aiiis
Attributes of Paper Other Than Fluorescence
In addition to variations in the fluorescence of the paper used to print the stamps from these booklets, there are also variations in the other physical characteristics. Generally, all of the paper used to print the stamps from the booklets are horizontal wove, rather than the vertical wove paper that was used to print the sheet stamps with dextrose gum. Other than this characteristic, I have found four different types of paper as shown below:

This type of paper is very white, even when viewed against a stark background. Under magnification, it is seen to have a highly porous surface, so that it is uncoated. There is no visible ribbing on the gum, and there is no clear mesh pattern when the paper is viewed against strong back lighting.
The scan below shows the back:

As you can see, there is no visible ribbing, and very smooth cream coloured gum.
Now, let's look at the next type:

This type of paper came from an intact booklet that was pristine in every way. There were no oil stains on either the front cover, the back cover or the interleaving. So I believe one could rule out the possibility of oil being spilled on the pane while it is in the booklet. The staple in the booklet matched other booklets from this issue and so the booklet did not appear to have been reassembled. So I reached the conclusion that the above is indeed a separate type of paper, which contains mineral oil. Under magnification it has a finely mottled surface appearance, and there is no visible mesh pattern when it is held up to the light.
The next scan shows the back:

Again, you can see that there is no clear mesh pattern. The fine diagonal crackly pattern on the gum shows up clearly on this paper, although the gum has a completely smooth appearance.
Now, let't take a look at the third type:


This paper is similar to the third type above, except that there is no visible vertical mesh, even when it is held up to the light. The scan below shows the back of the above stamp.

Once again. the lack of mesh pattern is clear, and you can see that the gum is smooth and cream coloured.
Paper Fluorescence
Unitrade lists four levels of paper fluorescence on these booklets and these stamps:

Both stamps are clearly on non-fluorescent paper. The left one appears brighter in this picture than it actually is, which is a violet grey, while the stamp at the left is a clear violet colour under UV. None of the other papers exhibited a non-fluorescent appearance. Thus it would appear that all of the non-fluorescent stamps are the first type of paper discussed above - the very white paper with porous surface.
The next picture shows the stamp on oily paper under the UV light:

Again, this paper appears brighter here than it actually is. In reality, it is a dull fluorescent greyish colour, with very few high fluorescent fibres in the paper, that affect the appearance, but not enough to take it from dull fluorescent to low fluorescent. So at least one of the dull fluorescent flecked papers is on the second type of paper.
Now let's look at the third type of paper, which appears to exhibit the most variation of all:


The stamp at the top is the LF-fl paper whereas the bottom stamp is the MF-fl paper. The top stamp is dull fluorescent brownish grey, with a sparse concentration of MF fibres and a very sparse concentration of HF fibres. These fibres are sufficiently bright and present in sufficient quantity to raise the overall perceived fluorescence of this paper from DF to LF.
The bottom stamp is dull fluorescent bluish grey, but contains sparse concentrations of low, medium and high fluorescent fibres. These give the paper an overall MF appearance.
So there are at least five different levels of fluorescence associated with the third type of paper, and it is this paper type that contains most of the listed varieties for this booklet.
Now, let's take a look at the last type:

Shades
In my study of these stamps, I have found three distinct shades. Most of the shades are shades of rosine. However a few, especially those on the non-fluorescent paper are the carmine red shades. The scan below shows these three shades:

Perforations
The perforation is reported as line 12.0, but is actually found in the four different measurements that are found on the sheet stamps, being 11.85, 11.95, 11.95 x 11.85 and 11.85 x 11.95. The existence of the straight edges on the outside margins of these stamps makes measuring the vertical perforations difficult, because you have no second perforation tooth to use as a reference point when aligning the guide line on the Instanta gauge. Once way to combat this is to place a second pane beneath the first, with and use it to help align your gauge. Once your gauge is properly aligned, you can take an accurate reading.
Gum
The gum found on the stamps from these booklets is dextrose of course, but it is not the same as the dextrose gum that is found on the majority of the sheet stamps. I have found three different types of gum:

The cream gum is shown on the left, while the yellowish cream gum is shown on the right.
Distinguishing Single Stamps From The Miniature Pane Stamps
Many collectors have difficulty distinguishing the booklet stamps from those coming from the miniature panes. However, there is one important characteristic, that will enable you to tell with close to 100% certainty, most of the time, which straight edged stamps come from booklets versus which come from miniature panes. Both are on horizontal wove paper, so you cannot use that characteristic to make the distinction. Instead, you look at the appearance of the straight edges themselves.
The booklet stamps will have deckled edges, which is to say that they are not perfectly straight. Under magnification, and most often without it, you can see bumps and uneven spots along the edge. This has occurred because the booklets were assembled, stapled and then cut apart. Because the cutting blades had to go through two covers and interleaving first, in order to get to the panes, they cuts of the panes are not clean. It is the same effect as trying to cut apart paper with dull scissors. In contrast, the miniature panes were cut apart directly, so the edges of the panes are perfectly straight and clean, even under 10x magnification. There are a few instances where a booklet pane will have a clean outer edge, and in these instances, one has to look at the direction of the paper weave. Generally, the miniature panes were printed on vertical wove paper, while the booklets were printed on horizontal wove paper. So if you have a straight edged stamp on vertical wove, it is from a miniature pane, rather than a booklet.
The Miniature Panes and Stamps From Panes - Unitrade #457bs and bis
Attributes of Paper Other Than Fluorescence
As stated previously, the paper used to print these panes is the same vertical wove cream paper used to print the sheet stamps. It has a smooth printing surface, with a very light coating that prevents any loose paper fibres from appearing on the surface. There is no ribbing visible, when the gum side is viewed, or the ribbing is very light. However, when held up to the light, a clear horizontal mesh is visible.
Paper Fluorescence
Unitrade lists two types of paper now, whereas until relatively recently, they only listed dull fluorescent paper. Now they list both dull fluorescent and non-fluorescent. The non-fluorescent paper is usually either a deep violet colour, or a deep violet grey under the UV lamp. The paper will also appear slightly different than the DF paper, with respect to its colour and gum, which is another way to identfy it positively.
The dull fluorescent paper can be found in grey, violet grey and yellowish grey colours, which refers to the colour of the paper under the UV light. Telling the NF paper from the DF can be tricky if you do not have experience with the paper types. However, the NF paper is quite obvious, once you know what to look for. Generally it must have a truly dead appearance. If there is any white in the paper at all under UV, or greyish white, or light grey, chances are it is not the NF paper, but rather a variation of DF.
Shades
I have found two shades on these panes:

This pane is on the dull fluorescent violet grey paper and is printed in deep rosine.

This pane is printed on the non-fluorescent violet grey paper, and is printed in carmine-red ink.
Perforations
As far as I know, four perforations are possible on these panes: 11.85 line, 11.95 line, 11.85 x 11.95 line and 11.95 x 11.85 line. However, both of the panes that I have in stock that I have examined were perforated 11.85 exactly.
Gum
I have found two types of gum on these panes:
The BABN Booklet Stamps - Unitrade #457cs, cis, dis and dsi
Attributes of Paper Other Than Fluorescence
The paper used to print these stamps is a horizontal cream wove paper. Within this distinction though, there are three distinct types of paper that differ in other terms:
Paper Fluorescence
According to Unitrade, both booklets from which these stamps came were either printed on completely non-fluorescent paper, or non-fluorescent paper with fluorescent fibres. For the 25c booklet, McCann lists dull fluorescent and dull fluorescent paper with fluorescent fibres as well.
Let's take a look at the different types of paper, starting with the stamps from the 25c booklets:

The two basic colours of paper under the UV lamp for the stamps of this booklet are dull fluorescent greyish white, and dull fluorescent violet grey. The violet grey does look deeper than the greyish white, which is why both McCann and Unitrade classify it as non-fluorescent. In my opinion though, it is not deep enough to be truly non-fluorescent. The paper of these stamps is the first type described above.
Here are these same papers with fluorescent fibres in the paper:


The stamp on the left is non-fluorescent, light violet grey, while the one on the right is dull fluorescent greyish white. Neither of these papers show any fluorescent fibres, and they are both the third type described above, with the visible mesh and ribbing on the gummed side of the stamps.
There is a variation of the non-fluorescent violet grey, which does contain a very few medium and high fluorescent fibres. A picture is shown below:

This is very different from the other stamps that came from the 25c booklet, in that there are many, many fewer fluorescent fibres in this paper, as compared to the stamps from the 25c booklet. Again, this paper is the third type described above, which shows clear ribbing on the gummed side.
Thus there are three different papers found on the stamps of these booklets.
Shades
25c Booklets
I have found four different shades on the stamps from these booklets. Two are fairly obvious, but the other two are very subtle variations of the first two shades.
Let's take a look at the first two of these:

The stamp on the left is clearly much brighter than the one on the right. The stamp is deep carmine red on the Gibbons colour key. The stamp on the right is a near perfect match to Gibbons's deep carmine shade. These colours are not altered significantly when the stamps are viewed under UV light, and they appear carmine-red.
Now, for the next two shades:

$1 Booklets
So far I have only found a single shade on the stamps of these booklets.

Perforations
The perforation for these stamps is listed in most standard catalogues, as 10. However, as McCann notes, it is actually comb 9.9.
Gum
I have found two types of gum on these stamps:
Plate Flaws
Unitrade does not list any plate flaws on these stamps, but McCann notes that there are two constant varieties that can be found on these booklets:
Distinguishing Singles From Each Booklet
At first is may seem as though it would be difficult to identify which booklet some of the single stamps come from. However, once you are familiar with the characteristics of the booklets and the stamps, it is usually fairly easy to identify them.
Firstly, any perf. 10 stamp, which has perforations on all sides can only have come from one of the 7 middle positions in the larger $1 booklets, as this was the only booklet to contain 3 columns of stamps. The smaller, 25c booklets contained two columns of stamps: one column of 4c stamps and 1 column of 1c stamps. The 4c stamps are always on the right. The $1 booklets only had a single straight edge along the bottom of the booklet. The other stamps at the sides had trimmed perforations, but the perforations are generally always visible. Thus, any single that has a straight edge on the right side only, or on both the right and bottom edges must have come from the 25c booklet, while any stamp with a straight edge only along the bottom will have come from the $1 booklet only. Any stamp with a straight edge at left or on the bottom and left is likely from the $1 booklet, where the perforations have been completely trimmed off. However, that would usually leave the stamp with little to no left hand margin to speak of.
The Coil Stamps Perforated 9.5 Horizontally
Attributes of Paper Other Than Fluorescence
The paper used to print these coil stamps is distinctly different from that used for the sheet stamps, in the sense that the printing surface of the paper does not contain any surface coating. Thus, under magnification, the surface appears highly porous, with clear loose fibes here and there on the printing surface. Both horizontal and vertical wove papers can be found as follows:
Paper Fluorescence
LF versus DF Paper

The stamp on the right is the dull fluorescent paper, while the stamp on the left is the low fluorescent paper, with fluorescent fibres. Generally, the dull fluorescent paper is a grey colour under UV that has a slight yellowish tinge, that is not apparent from the above picture, but is nonetheless present on the stamps. The low fluorescent paper is usually a violet grey colour and contains fluorescent fibres that vary both in quantity, and in brightness. Some of the dull fluorescent papers contain a very small number of fluorescent fibres as well, but not in sufficient concentration to raise the overall perceived fluorescence from dull fluorescent to low fluorescent.
Let's take a look at some of the low fluorescent papers. I've done the best I can to show them in the pictures that follow, but unfortunately the camera on my phone does not do the best job at highlighting the differences:

The stamp at the upper left is a dull fluorescent greyish colour and has a very sparse concentration of low, medium and high fluorescent fibres in the paper. These fibres raise the overall level of fluorescence from dull to low. The stamp at upper right is similar, except that the basic paper colour is dull fluorescent violet grey. The lower left stamp is dull fluorescent grey, and contains very sparse concentrations of low, medium and high fluorescent fibres. Again, these fibres raise the overall perceived fluorescence from dull fluorescent to low fluorescent. The stamp at the lower right is low fluorescent greyish, with very sparse concentrations of low, medium and high fluorescent fibres. In this case, the fibres do make the paper appear brighter, but not brighter than low fluorescent.
So, there are at least four varieties of low fluorescent paper.
Now let's take a look at some of the dull fluorescent papers:

The stamp at the top left is dull fluorescent brownish grey colour, with very few medium and high fluorescent fibres in the paper. These fibres are barely noticable, and have no effect on the overall perceived level of fluorescence. The stamp at the top right is dull fluorescent deep grey, with 1-2 low fluorescent and 1-2 medium fluorescent fibres. The stamp on the bottom left is dull fluorescent violet grey, with 1-2 low fluorescent fibres and 1-2 medium fluorescent fibres. The stamp at the bottom right is dull fluorescent deep grey, with just 2 medium fluorescent fibres in the paper.
So, there are at least four varieties of dull fluorescent paper.
Shades
In my examination of these stamps, I have really only come across two shades, and both of them are very, very close to one another. Generally, they are the mid-range carmine-red and deep rosine shades. You generally will not see either the deeper carmine reds of the early sheet stamp printings, nor will you see the bright rosines of the PVA gum period. The scan below shows the two shades that I have found on these coil stamps:
Perforations
Although Unitrade and other standard catalogues list the perforation of this stamp as 9.5 horizontally, McCann actually lists this as perf. 9.4.
Gum
These coils can be found with two types of dextrose gum:
Jump Strips
This coil stamp can be found with small jumps in the horizontal alignment between the stamps. Generally the horizontal alignment of one stamp is 0.5 mm or less out of alignment with the stamp above it. This is a very small difference, and is very easily overlooked if you do not know what to look for. These can of course, exist with every paper, gum and shade variety I have discussed.
Cutting Guideline Strips
The coils were produced by printing sheets of stamps and then cutting them apart into strips, which were then joined into rolls of 500 stamps. To help improve accuracy of the cutting, guide lines, consisting of a short vertical line in the colour of the stamp were printed in the margins between the columns of stamps. Ordinarily when the cutting was accurate, these guidelines would be lost in the cutting process. But where the cutting was off to the left or right, it will be possible to see these guidelines in the margins at either the left or right. These are highly sought after and very collectible. Again, these can exist with every paper, gum and shade variety I have discussed.
Repair Paste Up Strips
Where the strips were joined to form the roll, you have a repair paste-up. This is simply a gummed, perforated piece of paper, to which each ends of the strip were joined. Normally, these are collected as either pairs or strips. These can also, naturally exist with every paper, shade and gum variety I have discussed so far.
Start and End Strips
The first 10 tabs at the start of the rolls were blank, as were the last 10. So it is possible to collect strips of 4 stamps or more, attached to the leader strip of 10 blank labels, called a starter strip, or the 10 end labels, called an end strip. These are very scarce and often, the strips you see will be shorter, either containing fewer labels, and fewer stamps. Of course, they can also exist with every paper, gum and shade variety I have discussed.
This concludes my discussion of these stamps and this value of the series. Next week, I will start my examination of the 5c stamps, depicting the Atlantic fishing village.
I would like to remind readers of the fact that I am leaving E-bay on July 31, 2018. In preparation for this event and the grand opening of the Brixton-Chrome website, I will be extending a special offer to new customers:
If you become a registered customer before July 31, 2018, you will receive an extra 5% discount, over and above the discounts of 5%-20% that I normally offer, FOREVER, as long as you are a customer of Brixton-Chrome. This means that you will always receive at least a 5% discount on every order and you can save as much as 25% on orders over $100 USD. Be sure to message me with your information if you want to register. It is that simple.
Below is a copy of my information brochure about the advantages of shopping on the new website, as compared to E-bay and other online marketplaces. Click on the image if you wish to enlarge it.


The coils are listed by Unitrade as having all the usual varieties associated with CBN printed coils, such as jump strips, cutting guideline strips and repair paste-ups. However, in addition, there are narrow and wide spacing strips that exist. Unitrade notes the existence of these, but does not list them. Unitrade also lists two basic paper types: DF and LF-fl. However, as we shall see, there are several different types of paper, shade and gum on the coil stamps. So that it is possible to build a considerable amount of scope into a collection of them.
The CBN Booklet Stamps Perf. 12 - Unitrade #457as, ais, aiis, and aiiis
Attributes of Paper Other Than Fluorescence
In addition to variations in the fluorescence of the paper used to print the stamps from these booklets, there are also variations in the other physical characteristics. Generally, all of the paper used to print the stamps from the booklets are horizontal wove, rather than the vertical wove paper that was used to print the sheet stamps with dextrose gum. Other than this characteristic, I have found four different types of paper as shown below:

This type of paper is very white, even when viewed against a stark background. Under magnification, it is seen to have a highly porous surface, so that it is uncoated. There is no visible ribbing on the gum, and there is no clear mesh pattern when the paper is viewed against strong back lighting.
The scan below shows the back:

Now, let's look at the next type:

This type of paper came from an intact booklet that was pristine in every way. There were no oil stains on either the front cover, the back cover or the interleaving. So I believe one could rule out the possibility of oil being spilled on the pane while it is in the booklet. The staple in the booklet matched other booklets from this issue and so the booklet did not appear to have been reassembled. So I reached the conclusion that the above is indeed a separate type of paper, which contains mineral oil. Under magnification it has a finely mottled surface appearance, and there is no visible mesh pattern when it is held up to the light.
The next scan shows the back:

Now, let't take a look at the third type:

This paper is an off-white colour when placed against a stark white background, but is much whiter in appearance than the paper used to print the sheet stamps. It has a semi-smooth printing surface, that is clearly uncoated under magnification. There is some surface porosity visible on this paper, though not nearly as much as we see on the first type. There is no ribbing visible on the gum side, but when you hold these stamps up to the light, you can see a very clear vertical mesh pattern in the paper.
Here is the back of the above stamp:

If you look carefully toward the top of this scan and then relax your gaze as you look down the stamp, you can just make out the faint vertical mesh pattern. The gum again is smooth and cream coloured.
Now, for the last type:


Paper Fluorescence
Unitrade lists four levels of paper fluorescence on these booklets and these stamps:
- Non-fluorescent (NF), referred to as dead by McCann.
- Dull fluorescent (DF), also listed in McCann.
- Dull fluorescent with fluorescent fibres (DF-fl). Also listed in McCann.
- Medium fluorescent (MF), also listed in McCann.
McCann lists low fluorescence (LF) in addition to the above. McCann, also lists different combinations of paper fluorescence for the panes that make up the combination booklet of the 1c and 4c panes. If all combinations of paper fluorescence are possible, there should be 16 different booklets, and as many as 32 different, if the booklets can be found both with, and without interleaving. McCann lists 9 of these, plus a booklet with the earlier Wilding cover. So, it does not appear that 7 of the possible 16 varieties have been recorded. However, the focus of this post is the 4c booklet stamps, and not the complete booklets, so I will not list the booklet varieties here.
In addition to the overall fluorescence of the paper, there are different colours that the paper appears under UV, varying from violet, to grey, to a brownish grey. These varieties will be illustrated below. I will look at the different varieties of fluorescence in terms of the four main paper types shown above, starting with the first one.

Both stamps are clearly on non-fluorescent paper. The left one appears brighter in this picture than it actually is, which is a violet grey, while the stamp at the left is a clear violet colour under UV. None of the other papers exhibited a non-fluorescent appearance. Thus it would appear that all of the non-fluorescent stamps are the first type of paper discussed above - the very white paper with porous surface.
The next picture shows the stamp on oily paper under the UV light:

Again, this paper appears brighter here than it actually is. In reality, it is a dull fluorescent greyish colour, with very few high fluorescent fibres in the paper, that affect the appearance, but not enough to take it from dull fluorescent to low fluorescent. So at least one of the dull fluorescent flecked papers is on the second type of paper.
Now let's look at the third type of paper, which appears to exhibit the most variation of all:

In this picture we have dull fluorescent and dull fluorescent flecked papers. Again, the picture makes these appear brighter than they are. The upper left stamp is on dull fluorescent greyish paper, with no fluorescent fibres at all in the paper. The stamp on the upper right is dull fluorescent violet grey with very few medium, high fluorescent and hibrite papers. These fibres make the paper appear a little brighter, but not the the point of it being low fluorescent overall. Thus it is another variation of the DF-fl paper. Finally, the stamp on the bottom row is dull fluorescent greyish, and contains very few medium and high fluorescent fibres.
Now, let's look at the low and medium fluorescent versions of this paper:

The stamp at the top is the LF-fl paper whereas the bottom stamp is the MF-fl paper. The top stamp is dull fluorescent brownish grey, with a sparse concentration of MF fibres and a very sparse concentration of HF fibres. These fibres are sufficiently bright and present in sufficient quantity to raise the overall perceived fluorescence of this paper from DF to LF.
The bottom stamp is dull fluorescent bluish grey, but contains sparse concentrations of low, medium and high fluorescent fibres. These give the paper an overall MF appearance.
So there are at least five different levels of fluorescence associated with the third type of paper, and it is this paper type that contains most of the listed varieties for this booklet.
Now, let's take a look at the last type:

This paper is actually low fluorescent bluish grey under the UV, with a sparse concentration of LF fibres and a very sparse concentration of MF fibres. These brighten the paper's appearance, but not enough to take it from LF to MF paper. Thus it is another variation of the LF-fl paper.
All in all then, there are at least nine different types of paper found on the stamps from these booklets.
Shades
In my study of these stamps, I have found three distinct shades. Most of the shades are shades of rosine. However a few, especially those on the non-fluorescent paper are the carmine red shades. The scan below shows these three shades:

The stamp on the left is carmine red on the Gibbons colour key, and this is on the non-fluorescent, porous paper. The stamp in the middle is rosine on the Gibbons key. The stamp on the right is a slightly deeper version of the rosine shade. Under UV light, the carmine red appears a darker carmine, but the other two shades appear carmine red.
It is not clear whether or not all three of these shades can be found on all the different paper varieties, but I would assume that with enough patience, it is probably possible to find them all for each different paper type.
Perforations
The perforation is reported as line 12.0, but is actually found in the four different measurements that are found on the sheet stamps, being 11.85, 11.95, 11.95 x 11.85 and 11.85 x 11.95. The existence of the straight edges on the outside margins of these stamps makes measuring the vertical perforations difficult, because you have no second perforation tooth to use as a reference point when aligning the guide line on the Instanta gauge. Once way to combat this is to place a second pane beneath the first, with and use it to help align your gauge. Once your gauge is properly aligned, you can take an accurate reading.
Gum
The gum found on the stamps from these booklets is dextrose of course, but it is not the same as the dextrose gum that is found on the majority of the sheet stamps. I have found three different types of gum:
- A cream coloured, smooth gum with a glossy sheen.
- A yellowish cream gum with a semi-gloss sheen, and
- A yellowish cream gum with a satin sheen.
I have not found either the streaky yellowish cream gum that is so often seen on the sheet stamps, nor have I found the blotchy gum found on some of the 1970 printings of the sheet stamps. This makes sense, as these stamps would have been replaced by the BABN booklet stamps mid way through 1968.
The basic difference between the cream and yellowish cream gums is shown below:

The cream gum is shown on the left, while the yellowish cream gum is shown on the right.
Distinguishing Single Stamps From The Miniature Pane Stamps
Many collectors have difficulty distinguishing the booklet stamps from those coming from the miniature panes. However, there is one important characteristic, that will enable you to tell with close to 100% certainty, most of the time, which straight edged stamps come from booklets versus which come from miniature panes. Both are on horizontal wove paper, so you cannot use that characteristic to make the distinction. Instead, you look at the appearance of the straight edges themselves.
The booklet stamps will have deckled edges, which is to say that they are not perfectly straight. Under magnification, and most often without it, you can see bumps and uneven spots along the edge. This has occurred because the booklets were assembled, stapled and then cut apart. Because the cutting blades had to go through two covers and interleaving first, in order to get to the panes, they cuts of the panes are not clean. It is the same effect as trying to cut apart paper with dull scissors. In contrast, the miniature panes were cut apart directly, so the edges of the panes are perfectly straight and clean, even under 10x magnification. There are a few instances where a booklet pane will have a clean outer edge, and in these instances, one has to look at the direction of the paper weave. Generally, the miniature panes were printed on vertical wove paper, while the booklets were printed on horizontal wove paper. So if you have a straight edged stamp on vertical wove, it is from a miniature pane, rather than a booklet.
The Miniature Panes and Stamps From Panes - Unitrade #457bs and bis
Attributes of Paper Other Than Fluorescence
As stated previously, the paper used to print these panes is the same vertical wove cream paper used to print the sheet stamps. It has a smooth printing surface, with a very light coating that prevents any loose paper fibres from appearing on the surface. There is no ribbing visible, when the gum side is viewed, or the ribbing is very light. However, when held up to the light, a clear horizontal mesh is visible.
Paper Fluorescence
Unitrade lists two types of paper now, whereas until relatively recently, they only listed dull fluorescent paper. Now they list both dull fluorescent and non-fluorescent. The non-fluorescent paper is usually either a deep violet colour, or a deep violet grey under the UV lamp. The paper will also appear slightly different than the DF paper, with respect to its colour and gum, which is another way to identfy it positively.
The dull fluorescent paper can be found in grey, violet grey and yellowish grey colours, which refers to the colour of the paper under the UV light. Telling the NF paper from the DF can be tricky if you do not have experience with the paper types. However, the NF paper is quite obvious, once you know what to look for. Generally it must have a truly dead appearance. If there is any white in the paper at all under UV, or greyish white, or light grey, chances are it is not the NF paper, but rather a variation of DF.
Shades
I have found two shades on these panes:
- The dull fluorescent paper panes are printed in shades of rosine.
- The panes printed on non-fluorescent paper are generally printed in shades of carmine-red.
Both shades are shown in the scans below:

This pane is on the dull fluorescent violet grey paper and is printed in deep rosine.

Perforations
As far as I know, four perforations are possible on these panes: 11.85 line, 11.95 line, 11.85 x 11.95 line and 11.95 x 11.85 line. However, both of the panes that I have in stock that I have examined were perforated 11.85 exactly.
Gum
I have found two types of gum on these panes:
- On the DF paper, the gum is yellowish cream, smooth gum, with a semi gloss sheen, which is the same as that found on the sheet stamps.
- On the NF paper, the gum is a cream colour and has a glossy sheen.
The BABN Booklet Stamps - Unitrade #457cs, cis, dis and dsi
Attributes of Paper Other Than Fluorescence
The paper used to print these stamps is a horizontal cream wove paper. Within this distinction though, there are three distinct types of paper that differ in other terms:
- The printed surface is smooth, but uncoated. There are no loose or stray fibres on the surface, but there are many small depressions in the paper surface, which are only visible under magnification. The printed surface appears quite porous. When viewed against strong back lighting, there is no visible mesh pattern.
- The printed surface is smooth and uncoated. There are no loose or stray fibres on the surface. The printed surface appears porous, but there are no depressions in the paper surface. When held against strong back lighting, it is possible to see vertical mesh in the paper.
- The printed surface is smooth and uncoated. There are no loose or stray fibres on the surface. The printed surface does not appear especially porous. On the gummed side, you can see feint vertical ribbing and when held up to strong back lighting, the vertical mesh is highly visible.
The first two paper types appear to be confined to the stamps that come from the 25c booklets, while the third type comes from the $1 booklets.
Paper Fluorescence
According to Unitrade, both booklets from which these stamps came were either printed on completely non-fluorescent paper, or non-fluorescent paper with fluorescent fibres. For the 25c booklet, McCann lists dull fluorescent and dull fluorescent paper with fluorescent fibres as well.
Let's take a look at the different types of paper, starting with the stamps from the 25c booklets:

The two basic colours of paper under the UV lamp for the stamps of this booklet are dull fluorescent greyish white, and dull fluorescent violet grey. The violet grey does look deeper than the greyish white, which is why both McCann and Unitrade classify it as non-fluorescent. In my opinion though, it is not deep enough to be truly non-fluorescent. The paper of these stamps is the first type described above.
Here are these same papers with fluorescent fibres in the paper:

You can see the fibres very clearly in this picture because this is one of the few papers to contain hibrite fibres. There is actually very few medium fluorescent, high fluorescent and hibrite fibres present in the paper. Overall, these fibres constitute a very sparse concentration. Both of these stamps are on a dull fluorescent violet grey paper, which Unitrade calls NF-fl. These papers are all the second type described above.
So, it would appear that there are three types of paper for the stamps of the 25c booklets:
- There are two types of paper falling into the first category, with no visible mesh: one is dull fluorescent greyish white, which Unitrade calls DF, and the other is the dull fluorescent violet grey, which Unitrade calls NF.
- There is one type of the second type of paper, with the visible mesh, and this paper is the dull fluorescent violet grey with the fluorescent fibres, as shown above.
Now, let's take a look at the stamps from the $1 booklets:

The stamp on the left is non-fluorescent, light violet grey, while the one on the right is dull fluorescent greyish white. Neither of these papers show any fluorescent fibres, and they are both the third type described above, with the visible mesh and ribbing on the gummed side of the stamps.
There is a variation of the non-fluorescent violet grey, which does contain a very few medium and high fluorescent fibres. A picture is shown below:

Thus there are three different papers found on the stamps of these booklets.
Shades
25c Booklets
I have found four different shades on the stamps from these booklets. Two are fairly obvious, but the other two are very subtle variations of the first two shades.
Let's take a look at the first two of these:

The stamp on the left is clearly much brighter than the one on the right. The stamp is deep carmine red on the Gibbons colour key. The stamp on the right is a near perfect match to Gibbons's deep carmine shade. These colours are not altered significantly when the stamps are viewed under UV light, and they appear carmine-red.
Now, for the next two shades:

Here, the stamp on the right is brighter than the one on the left. The stamp on the left is closest to Gibbons' carmine-red. The stamp on the right is a little brighter, but essentially the same shade. So it is a bright carmine-red.
Under UV light, these shades appear bright carmine-red.
So far I have only found a single shade on the stamps of these booklets.

This is bright carmine red on the Gibbons colour key, and matches the bright carmine red shade identified on the 25c booklet stamps above. Under UV light, the colour appears a bright carmine red.
Perforations
The perforation for these stamps is listed in most standard catalogues, as 10. However, as McCann notes, it is actually comb 9.9.
Gum
I have found two types of gum on these stamps:
- A very glossy, colourless dextrose gum, that sometimes has, what appears to be horizontal strokes running through it.
- A cream coloured smooth gum with a semi-gloss sheen.
The first type of gum is found on printings of both the 25c and $1 booklets, while the second type of gum seems to be found mainly on the 25c booklets only.
Plate Flaws
Unitrade does not list any plate flaws on these stamps, but McCann notes that there are two constant varieties that can be found on these booklets:
- The first stamp of the second row has, what appears to be a round corner at lower right.
- There is a guideline visible between the first stamp in the top row and the first stamp in the second row.
Unfortunately I do not have an example of a booklet containing either variety, but will add images of the variety as illustrative examples become available. McCann lists both these varieties with and without fluorescent fibres in the paper.
Distinguishing Singles From Each Booklet
At first is may seem as though it would be difficult to identify which booklet some of the single stamps come from. However, once you are familiar with the characteristics of the booklets and the stamps, it is usually fairly easy to identify them.
Firstly, any perf. 10 stamp, which has perforations on all sides can only have come from one of the 7 middle positions in the larger $1 booklets, as this was the only booklet to contain 3 columns of stamps. The smaller, 25c booklets contained two columns of stamps: one column of 4c stamps and 1 column of 1c stamps. The 4c stamps are always on the right. The $1 booklets only had a single straight edge along the bottom of the booklet. The other stamps at the sides had trimmed perforations, but the perforations are generally always visible. Thus, any single that has a straight edge on the right side only, or on both the right and bottom edges must have come from the 25c booklet, while any stamp with a straight edge only along the bottom will have come from the $1 booklet only. Any stamp with a straight edge at left or on the bottom and left is likely from the $1 booklet, where the perforations have been completely trimmed off. However, that would usually leave the stamp with little to no left hand margin to speak of.
The Coil Stamps Perforated 9.5 Horizontally
Attributes of Paper Other Than Fluorescence
The paper used to print these coil stamps is distinctly different from that used for the sheet stamps, in the sense that the printing surface of the paper does not contain any surface coating. Thus, under magnification, the surface appears highly porous, with clear loose fibes here and there on the printing surface. Both horizontal and vertical wove papers can be found as follows:
- Vertical cream wove, no visible ribbing on the back, and clear horizontal mesh visible through strong back-lighting.
- Vertical cream wove, with very light horizontal ribbing visible on the gum side, and a faint horizontal mesh pattern visible through strong back-lighting.
- Vertical cream wove, with no ribbing visible on the gum side, and no mesh pattern visible when the stamp is held up to a strong back-light.
- Horizontal cream wove, with no ribbing visible on the gum side, and a faint horizontal mesh pattern visible when held up to a strong back light.
- Horizontal cream wove, with no visible ribbing on the gum side, and no mesh pattern visible when held up to a strong back-light.
- Vertical cream wove, with light horizontal and vertical ribbing visible on the gum side, and both light horizontal and vertical mesh visible, when held up to a strong back light.
Paper Fluorescence
LF versus DF Paper

The stamp on the right is the dull fluorescent paper, while the stamp on the left is the low fluorescent paper, with fluorescent fibres. Generally, the dull fluorescent paper is a grey colour under UV that has a slight yellowish tinge, that is not apparent from the above picture, but is nonetheless present on the stamps. The low fluorescent paper is usually a violet grey colour and contains fluorescent fibres that vary both in quantity, and in brightness. Some of the dull fluorescent papers contain a very small number of fluorescent fibres as well, but not in sufficient concentration to raise the overall perceived fluorescence from dull fluorescent to low fluorescent.
Let's take a look at some of the low fluorescent papers. I've done the best I can to show them in the pictures that follow, but unfortunately the camera on my phone does not do the best job at highlighting the differences:

The stamp at the upper left is a dull fluorescent greyish colour and has a very sparse concentration of low, medium and high fluorescent fibres in the paper. These fibres raise the overall level of fluorescence from dull to low. The stamp at upper right is similar, except that the basic paper colour is dull fluorescent violet grey. The lower left stamp is dull fluorescent grey, and contains very sparse concentrations of low, medium and high fluorescent fibres. Again, these fibres raise the overall perceived fluorescence from dull fluorescent to low fluorescent. The stamp at the lower right is low fluorescent greyish, with very sparse concentrations of low, medium and high fluorescent fibres. In this case, the fibres do make the paper appear brighter, but not brighter than low fluorescent.
So, there are at least four varieties of low fluorescent paper.
Now let's take a look at some of the dull fluorescent papers:

So, there are at least four varieties of dull fluorescent paper.
Shades
In my examination of these stamps, I have really only come across two shades, and both of them are very, very close to one another. Generally, they are the mid-range carmine-red and deep rosine shades. You generally will not see either the deeper carmine reds of the early sheet stamp printings, nor will you see the bright rosines of the PVA gum period. The scan below shows the two shades that I have found on these coil stamps:

Both are shades of rosine on the Gibbons colour key. The stamp on the left is an almost perfect match to the rosine swatch on the Gibbons colour key, while the stamp on the right is a darker version of the same colour. It is not carmine enough to be the carmine-red.
Under UV light, the shades do not fundamentally change from shades of red, so the inks are non-transformative. Some of the deeper rosines become carmine-red under UV, while others are a brighter carmine-red.
Perforations
Although Unitrade and other standard catalogues list the perforation of this stamp as 9.5 horizontally, McCann actually lists this as perf. 9.4.
Gum
These coils can be found with two types of dextrose gum:
- Yellowish streaky gum with a semi-gloss sheen, and
- Smooth, yellowish gum with a semi-gloss sheen.
As far as I can tell, both types of gum can be found on all of the paper types and fluorescence levels.
Jump Strips
This coil stamp can be found with small jumps in the horizontal alignment between the stamps. Generally the horizontal alignment of one stamp is 0.5 mm or less out of alignment with the stamp above it. This is a very small difference, and is very easily overlooked if you do not know what to look for. These can of course, exist with every paper, gum and shade variety I have discussed.
Cutting Guideline Strips
The coils were produced by printing sheets of stamps and then cutting them apart into strips, which were then joined into rolls of 500 stamps. To help improve accuracy of the cutting, guide lines, consisting of a short vertical line in the colour of the stamp were printed in the margins between the columns of stamps. Ordinarily when the cutting was accurate, these guidelines would be lost in the cutting process. But where the cutting was off to the left or right, it will be possible to see these guidelines in the margins at either the left or right. These are highly sought after and very collectible. Again, these can exist with every paper, gum and shade variety I have discussed.
Repair Paste Up Strips
Where the strips were joined to form the roll, you have a repair paste-up. This is simply a gummed, perforated piece of paper, to which each ends of the strip were joined. Normally, these are collected as either pairs or strips. These can also, naturally exist with every paper, shade and gum variety I have discussed so far.
Start and End Strips
The first 10 tabs at the start of the rolls were blank, as were the last 10. So it is possible to collect strips of 4 stamps or more, attached to the leader strip of 10 blank labels, called a starter strip, or the 10 end labels, called an end strip. These are very scarce and often, the strips you see will be shorter, either containing fewer labels, and fewer stamps. Of course, they can also exist with every paper, gum and shade variety I have discussed.
This concludes my discussion of these stamps and this value of the series. Next week, I will start my examination of the 5c stamps, depicting the Atlantic fishing village.
I would like to remind readers of the fact that I am leaving E-bay on July 31, 2018. In preparation for this event and the grand opening of the Brixton-Chrome website, I will be extending a special offer to new customers:
If you become a registered customer before July 31, 2018, you will receive an extra 5% discount, over and above the discounts of 5%-20% that I normally offer, FOREVER, as long as you are a customer of Brixton-Chrome. This means that you will always receive at least a 5% discount on every order and you can save as much as 25% on orders over $100 USD. Be sure to message me with your information if you want to register. It is that simple.
Below is a copy of my information brochure about the advantages of shopping on the new website, as compared to E-bay and other online marketplaces. Click on the image if you wish to enlarge it.

Comments
Post a Comment